Route 05 · Installation Guide for Lorn's Lure
THE MENU
F10. Eight tabs, every setting live-applied, nothing ever needs a restart. F9 for the diagnostic overlay.
Two keys to remember
| Key | Action |
|---|---|
| F10 | Open / close the UngodlyGFX menu — solid background, every setting, live-applied. The game pauses and mouselook freezes while it’s open (its own setting: PauseWhileMenuOpen), exactly like the game’s pause menu. |
| F9 | Toggle the diagnostic overlay — FPS + frametime plus a live readout of every override currently active: output vs internal resolution, VSync, cap, AF, shadows, AA mode. |
Both keys are rebindable from the Master tab or the config file. The defaults were chosen to dodge the game’s own bindings — Lorn’s Lure uses Tab for its options and F8 for its joke “Yassify” filter, so F10 and F9 are safe.
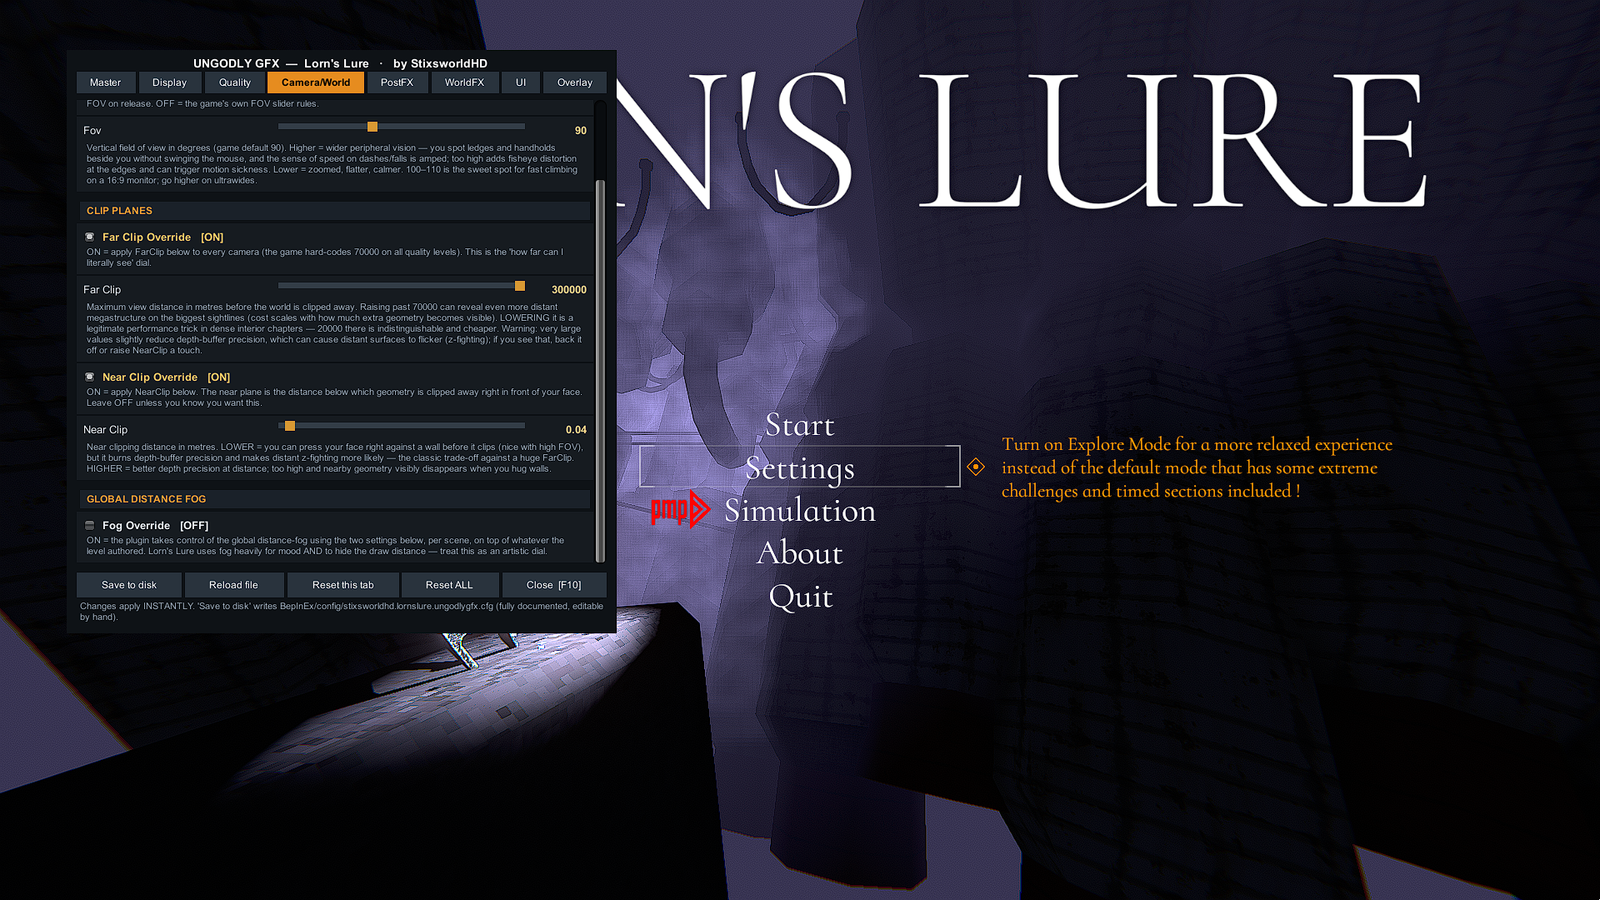
The eight tabs
Master
MasterEnable (the whole plugin’s on/off switch — off restores every
game default it touched), key rebinding, and menu behaviour. Flip MasterEnable for
instant vanilla-vs-ungodly comparisons.
Display
A real FPS cap (the game’s “600” actually means uncapped), VSync override (off / every refresh / every 2nd), and render scale 25–200% with bilinear or sharp point filtering. The HUD stays native-res crisp at any scale.
Quality
The engine room: the anisotropic filtering fix (forced up to x16), texture mip limit, LOD bias, pixel lights, full shadow control (mode, distance, resolution, cascades, projection), soft particles, reflection probes, and the async texture-upload boost that shortens level-load hitching.
Camera & World
An FOV override that actually sticks across level loads and camera swaps — and politely stays out of the way while you hold Zoom or a dash FOV-kick plays. Plus near/far clip overrides and global fog enable/density.
PostFX
Every PostProcessing v2 effect on the same pattern: Game Default / Force ON / Force OFF, plus a Tweak switch unlocking its parameters. Anti-aliasing (Off / FXAA / SMAA / TAA), bloom, AO, color grading, vignette, chromatic aberration, motion blur, grain, auto-exposure, depth of field, SSR.
WorldFX
The game’s own in-scene systems: Amplify Occlusion and SSSAO fully exposed, god rays on/off, fog-volume downsampling (a real performance lever in heavy scenes), the glitch-effect kill switch, and the Ungodly Sharpen pass with every meme channel neutralised by default.
UI
Independent HUD and menu scaling (0.5x–2x), HUD opacity, optional pixel-perfect UI,
and a canvas exclusion list. The game’s HUD canvas (LLUI) is
auto-detected.
Overlay
Everything about the F9 diagnostic overlay: corner, scale, and what it shows. It’s written allocation-shy, so it won’t cause the stutter it’s measuring.
Everything is live
Changes apply instantly as you drag a slider — there is no Apply button and nothing ever asks for a restart. The row of buttons along the menu’s bottom edge:
- Save to disk — writes the current state to the config file.
- Reload file — hot-loads the config from disk (this is how hand-edits made while the game runs take effect).
- Reset this tab / Reset ALL — back to shipped defaults, any time.
- Close [F10] — same as the key.
The config file, for hand-editors
Everything the menu does, the file does: BepInEx\config\stixsworldhd.lornslure.ungodlygfx.cfg.
It’s generated on first run and fully documented — every entry carries
the same gamer-friendly explanation you see in the menu, with min/max ranges stated. Edit it in any
text editor; if the game is running, press Reload file in the menu and your edits apply on
the spot.
The default philosophy, straight from the README: free wins are ON out of the box (AF x16, the async upload boost); anything with a real cost or a strong artistic opinion (render scale, the sharpener, forced effects, UI scaling) ships OFF — so a first launch looks identical to vanilla, just crisper where it’s free.
Three starting setups
The plugin’s own cost ladder, cheapest lever first: AF (free) → fog volume downsample → shadow distance/resolution → render scale down → AO sample counts down. These three recipes apply it in practice:
Performance rescue
Keep AF x16 (it’s free). Raise fog volume downsampling to 3–4, pull shadow distance and resolution down a notch, then drop render scale to 75–85% with bilinear filtering. The HUD stays sharp regardless — that’s the point of the proper camera-target resize.
Balanced & crisp
Defaults, plus: pick SMAA (what the game’s “MSAA” label secretly was) or TAA under PostFX, enable Ungodly Sharpen at a gentle strength, and set a real FPS cap at your refresh rate for even pacing.
The almost-DLAA look
Render scale 110–125% paired with the sharpener — the priciest toggle in the plugin, and the prettiest. Add TAA with its sharpness tweaked to taste, max shadows, and the Amplify Occlusion controls opened up.